Land Navigation requires determination, confidence, skill, and hard work.
Basics(Edit)
Map Information(Edit)
- Hill, Valley, Saddle, Draw, Spur (Ridges, Depressions, and Cliffs aren't really on the course)
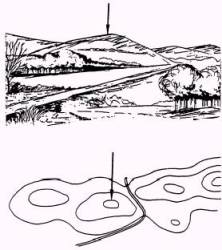
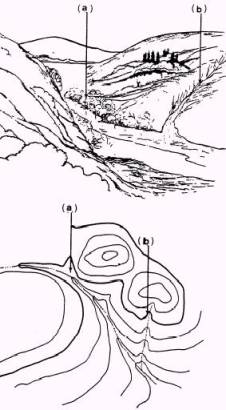
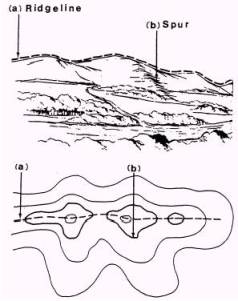
- Note the way U- and V-shaped contour lines work these
- Be able to visualize the way contour lines will affect the ground---how the lines translate to a 3D image.
- The course has subtle terrain, but it can still be useful. Sometimes all you know is that the ground underneath you slopes in a particular direction, but that is something you can read from the contour lines.
- Know Index, Intermediate, Supplementary (and know the interval, which is 5m/line in this case)
Colors:
- Know the Green vegetation, White clearing (Yes, they change a little over time, but they are surprisingly constant. If you read them on the map they are probably there in real life.)
- Red-Brown contour lines
Bench Mark (the ones that have actual survey markers)
Orientation & Coordinate Scale(Edit)
Map Orientation
- Usually you orienting according to real life (instead of insisting on always putting North at the top. Orient it so you are walking in the direction you are reading)
- Understand Magnetic North, Grid North, and the G-M angle (which is "Add 8 degrees to go from Grid to Magnetic" for the Hoffman course)
Know and practice with the Coordinate Scale

- Grid lines, Right Then Up (!) (the 4-digit grid "26 81" means "grid line 26 to the East, line 81 to the North")
- Decimal place, Right Then Up (!) (the 6-digit grid "263 819" means "300 meters East of 26, 900 meters North of 81")
- Same goes for 8-digit grids ("2631 8192" ... "310 meters E, 920 meters North")
- Always make sure the Coordinate Scale is not flipped over or upside down (read the words at the top right)
- Line up the 0's as your crosshairs, ignoring the plastic (sometimes the triangle cutout is too small, sometimes it is too big, but either way you ignore it and reference the "0"s)
- Plot and re-check everything, like the carpenters' "Measure Twice, Cut Once".
Compass(Edit)
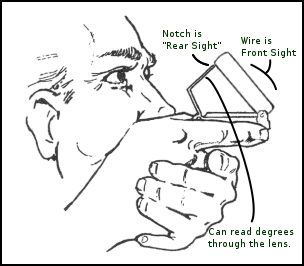
- Degrees are in red, on the inner ring. Ignore the mils (in black) on the outside. Those Mils, they Kills!
- If you get momentarily confused, you can use common sense. If you are shooting an azimuth towards the South and it says "32", then you are looking at 3200 mils, not 32 degrees. Instead look for the number closer to 180.
- 3 degrees per bezel ring click
- Use the cheek-hold technique for a more accurate shot:
- Get good at "Compass Quickdraw". There are different ways to do it, but make sure your compass is accessible and that you practice drawing/replacing it quickly to encourage frequent checks.
Pace Count(Edit)
- Understand how fatigue, terrain, load, etc., add steps to your 100m count.
- Use beads (A good way is to by hobby beads (e.g., from Wal-Mart) and thread them over 550 cord that is folded double with the white strings (guts) pulled out. This is just the right amount of tension without being very difficult to thread.)
- d = rt, the "dirt" formula:
- Distance = Rate * Time
- Rate = Distance / Time
- Time = Distance / Rate
- Know your land-nav speed and use it to estimate how long it is going to take you to get to your next point or checkpoint.
- If you don't know it estimate 2km/hr. It sounds slow but it is realistic when you account for map checks, slowdowns, and confusion.
Moving up(Edit)
Route Planning!(Edit)
Basically, you will travel using estimated distance, cardinal directions ("Southwest", not "223°"), bouncing between intersections of roads, draws, clearings, etc. Be smart! You will not want to beeline from point to point. You have to do what works for you, not necessarily what works for other people. The terrain walks and practical exercises will help you figure out what approaches you want to take.
Have several checkpoints per klick (1000m) to make sure you're on track.
- Use Backstops (terrain features that indicate when you have gone too far beyond your point) behind each checkpoint
Use Corridors and Handrails--like Backstops but to the sides.
- If you hit one you've veered to far, time to bounce back the other direction.
Use the Roads (Improved and Unimproved) as Checkpoints
- Not too close, you don't want to violate the rules. ("Parallel but don't handrail.")
- These usually form a backstop and a Corridor all at once.
- Use the strategic side of the terrain to protect yourself from deviating from the direction you expect to go.
Draws. The Hoffman course is all about those overgrown draws.
- Of course, some of the unimproved roads will not be on the map, and vice-versa (Five Points is an example). You will have to be aware of other terrain features and your distance traveled so you don't get distracted by spurious or missing unimproved roads.
- Don't bust 'em, if you can avoid it---especially at night. If you bust a draw at night you're either more awesome or more stupid than me.
- Close contour lines mean steep ground which means less water pooling which means less vegetation which means a better place to bust draws.
- Find the weak spots by handrailing them on your way around. Worst-case: you walk all the way around, Best case: you find a good crossing.
- Find places where other candidates have gone through. They exist, you just have to be patient enough to find them. Worst case you go all the way around the draw, but you probably can spot a good crossing before that.
- Check your compass frequently when going through a draw. Like every 20 steps. It is possible to fight for an hour to end up where you started
When practicing route planning, try writing everything down, and review it with a buddy. By the time you get to the real thing, you should be comfortable enough with Route Planning that you can just do it in your head every time.
Attack Points!(Edit)
- Select a solid terrain feature or landmark so that if you can't find your point on the final approach you can just backtrack to the Attack Point and re-shoot.
- As close to the objective as possible, hopefully under 300m or so.
- From the Attack Point to Objective is the only time you'll really use Dead Reckoning (travelling a specific distance and direction).
- SLLS (Stop, Look, Listen, Smell) for your points. The point-sitters are crafty foxen.
- Smart search patterns. If you intentionally "aim off" right you only have to search to the left.
- A terrain feature beyond your objective that signals when you've gone too far.
Landmarks!(Edit)
- Before exam day, you should at least know where these are:
- The TOC
- 3-wire Road
- 4-wire Road
- Puppy Palace
- Bowling Alley (plus the road that leads out of it to the North)
- Six Points
- Jurassic Park--big draw to the West
- Lookout tower (North of Jurassic Park)
- Five Points (South of Jurassic Park)
- Lake Bagget (and its authorized crossing)
- Scuba Road (and its dry crossing)
- "Dagobah", a.k.a., "The Great Lost North"
- Note all Happy Stakes. They are engineer stakes with a dogtag with a grid coordinate.
- If you observe them during the practice you can remember the spots later on
- They are better than GPS. There is no load time and they don't lose track of their satellites.
Bring(Edit)
- Headlamp
- Write in Rain notebook (or Index cards)
- Two Canteen Straws - Amazon, Ranger Joe's, etc.
- Pace Beads/"Ranger Beads" - See above.
Course Rules(Edit)
- Stay away from roads.
- When crossing roads, cross at 90 degree angles.
- No talking.
- ...
Additional Topics(Edit)
These aren't essential for navigating the course, but they might come in handy.
- Back Azimuth
- +180 if az <180
- -180 if az >180
- E.g.: 0's back azimuth is 180, 180's back azimuth is 0, 27's back azimuth is 207, 330's back azimuth is 150)
- Intersection - Determining the location of an unknown point by shooting an azimuth to it from two known points then finding the azimuths' intersection.
- Resection - Determining the current, unknown, location by shooting at two known points and crossing the azimuths.
- True North - The axis upon which the Earth spins. Usually closer to Grid North than Magnetic North.
General Advice(Edit)
Maximize the training time.
- Numerous practical exercises - They are not just for knocking out the minimum effort and then stopping. During this time you can become greatly more familiar with the course and with landmarks that you will be able to use on the day.
- Numerous classes - The cadre is not being antagonistic at this stage. They will teach the material and be available for further questions.
- Unlimited time sitting around with maps and buddies - Find the motivated candidates that want to talk about Route Planning or their experiences with specific draws and landmarks. Think of it like map recon for a real mission.
Rule the Night.
- A majority of your time is during the dark hours.
- Don't get discouraged or think it's good strategy to wait until day--the chemlights actually make finding some night time points easier.
- You're going to get a little beat up and discouraged. Just push through.
Make up time by moving out when you're on nonrestrictive terrain.
- You have to get aggressive, stay aggressive, and refuse to cut yourself a moments' slack.
- Don't forget to think. They say, "Land nav. is a thinking man's game. If you're not thinking about something, you're wrong." So don't get so distracted by the idea of moving quickly that you move in error.
Judiciously Mark the Map
- Don't overmark--you'll cover good information.
- Don't undermark--you might be surprised how well you remember a specific moment from before if you leave the right notes.
Tie your map/compass/everything down.
Don't get Injured. Be careful, bypass obstacles, wear boots with ankle support, maintain your feet, etc.
Battle Fatigue and Doubt
- Don't make stupid mistakes.
- Don't give in.
- You will make stupid mistakes--how will you react? Don't give in.